
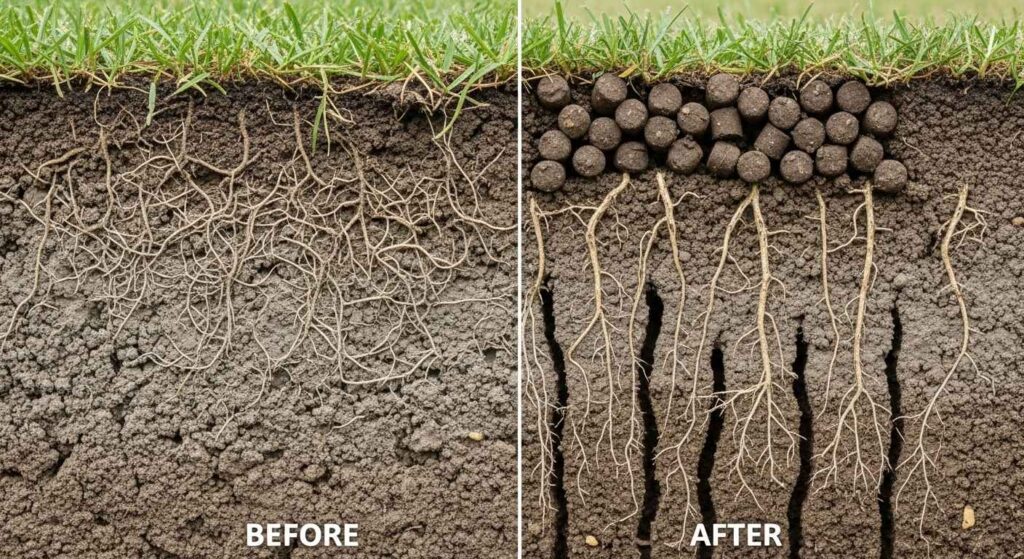
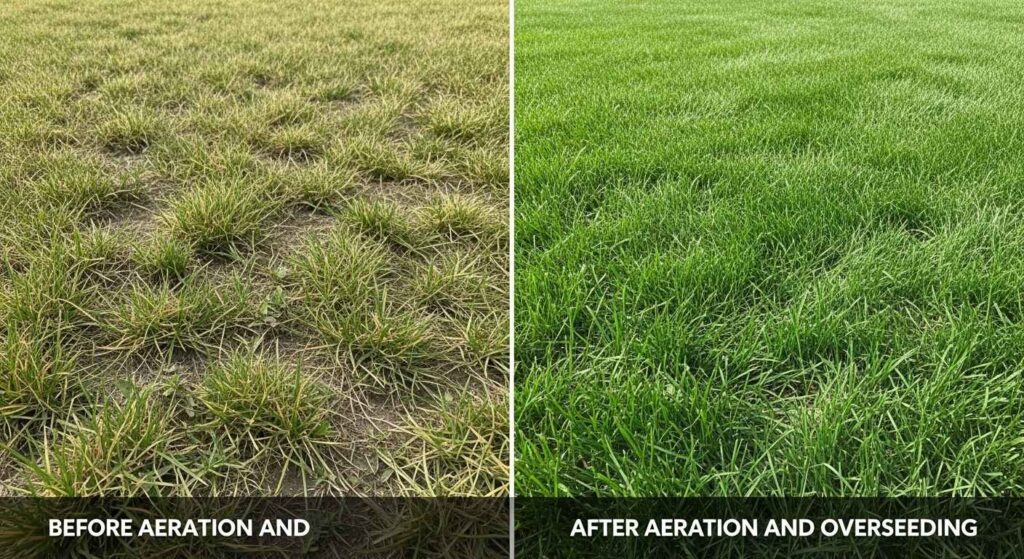
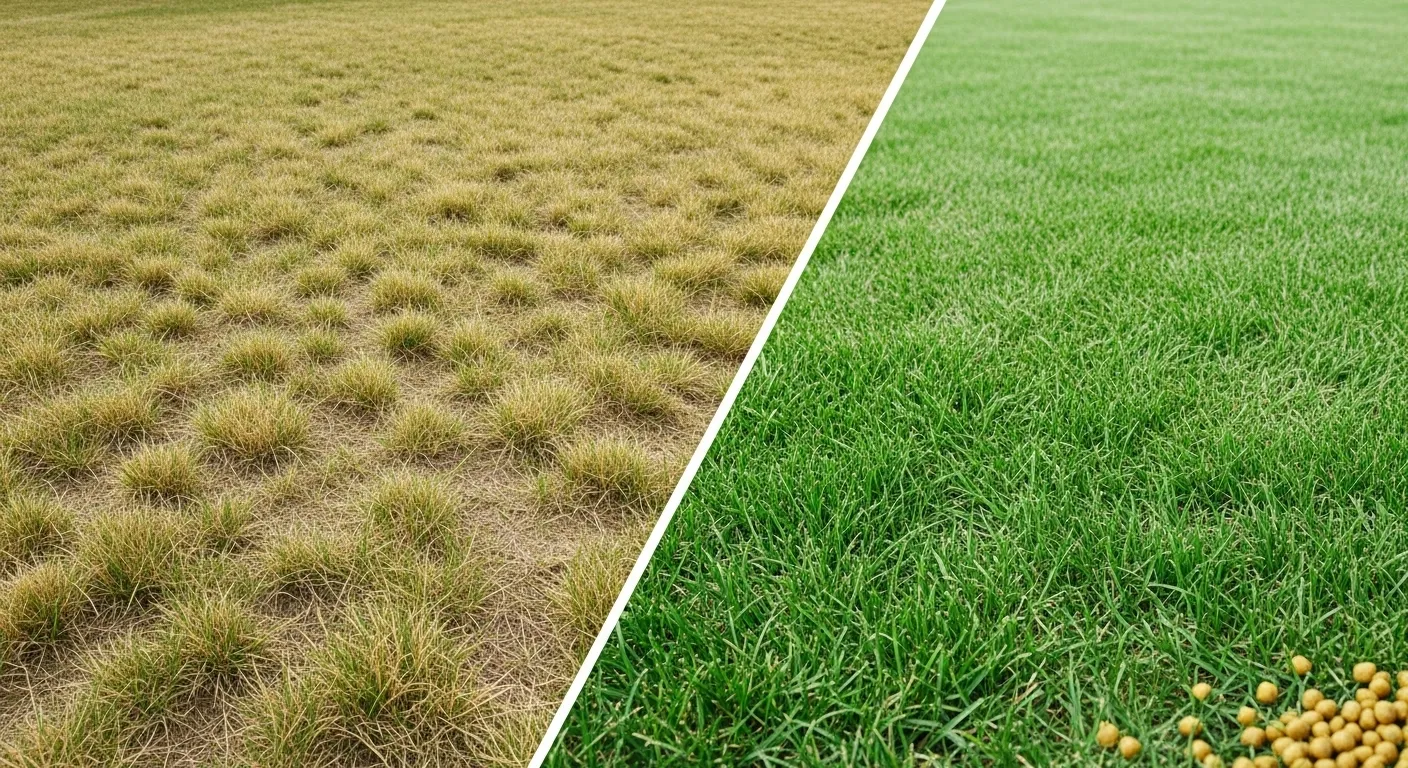
A thick, green lawn starts below the surface. Compacted soil just 1/4 to 1/2 inches thick can make a significant difference in the health and beauty of your lawn. Lawn aeration creates the foundation your grass needs to thrive by allowing air, water, and nutrients to reach the root zone.
This guide covers everything you need to know about lawn aeration, from the science behind why it works to step-by-step methods you can use at home.
What Is Lawn Aeration?
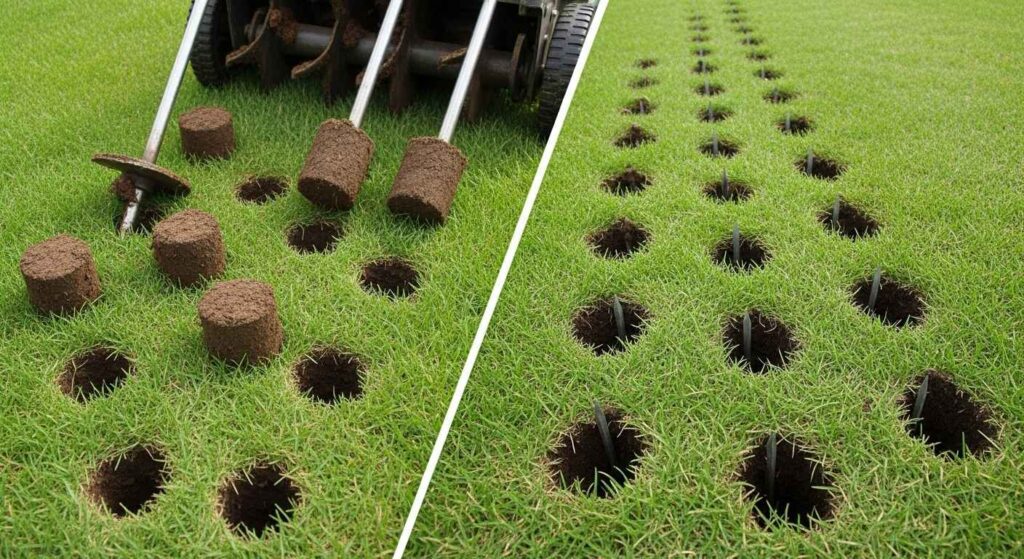
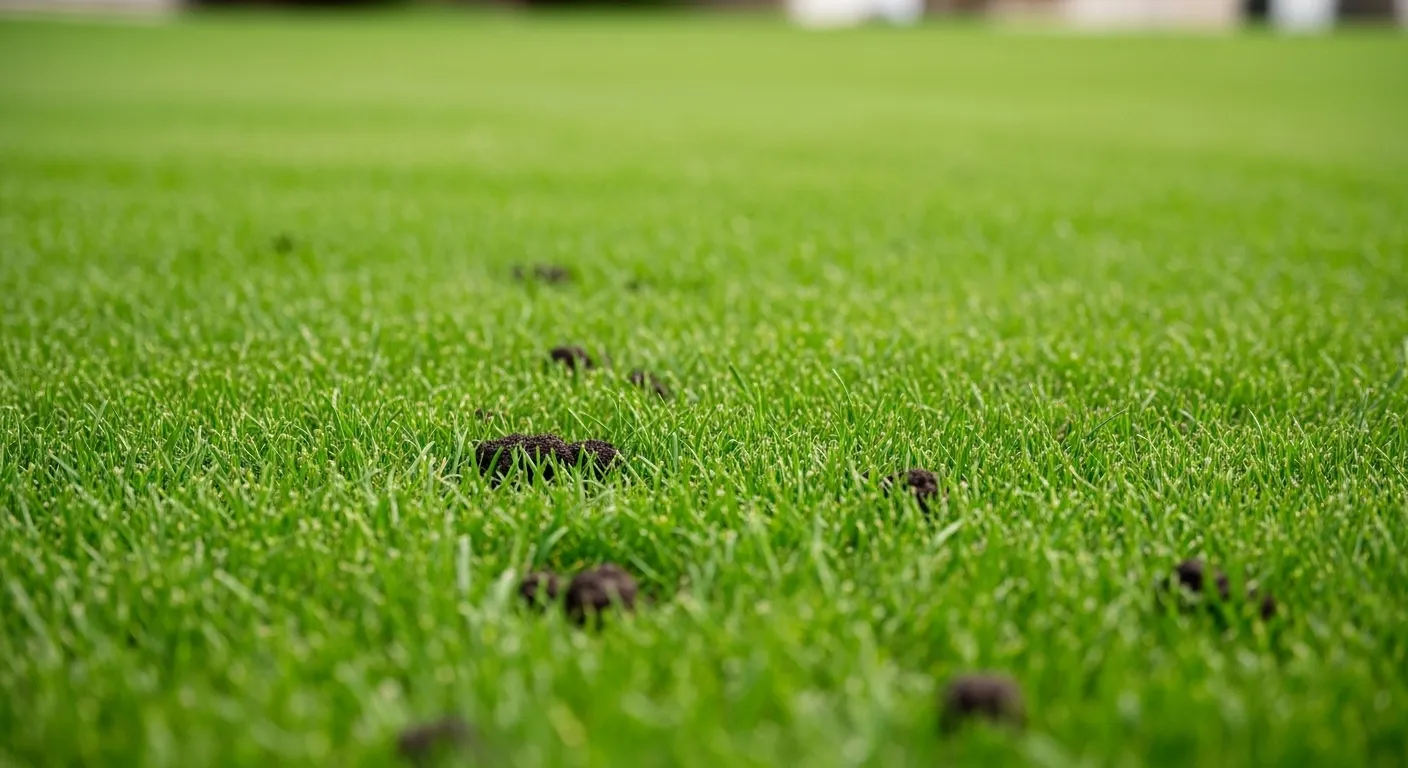
Aeration involves perforating the soil with small holes to allow air, water and nutrients to penetrate the grass roots. The process removes small plugs of soil from your lawn, creating channels that break up compacted earth.
There are two main types of lawn aeration:
- Core aeration: Removes actual plugs of soil (most effective method)
- Spike aeration: Creates holes without removing soil plugs
7 Major Benefits of Lawn Aeration
1. Reduces Soil Compaction
Compacted soil restricts the movement of air, water, and nutrients to the roots of your grass, making it difficult for your lawn to thrive. Heavy foot traffic, mowing equipment, and clay soil all contribute to compaction.
Aeration breaks up these dense layers, giving roots room to spread and grow.
2. Improves Water Absorption
Compacted soil causes water to run off instead of soaking in. After aeration, water penetrates deeper into the soil profile. This reduces pudding after rain and helps your lawn stay green during dry spells.
3. Enhances Nutrient Uptake
When nutrients penetrate deeper into the root zone, they become available to the turf. Aeration also stimulates microbial activity that helps nutrients in the soil become available to your turf.
Your fertilizer investment works better when nutrients can actually reach the root system.
4. Promotes Deeper Root Growth
Looser soil encourages better root development. Deeper roots mean:
- Better drought tolerance
- Improved nutrient absorption
- Stronger overall grass plants
- Less susceptibility to disease
5. Reduces Thatch Buildup
Thatch is a layer of dead grass and organic matter that builds up between the soil and green grass. Excessive thatch blocks water and nutrients. Aeration helps break down existing thatch and prevents future accumulation.
6. Improves Air Exchange
Grass roots need oxygen to function properly. Compacted soil creates anaerobic conditions that stress your lawn. Aeration restores proper air circulation to the root zone.
7. Creates Better Seed Germination
If you’re overseeding your lawn, aeration creates the perfect conditions for new grass to establish. Seeds fall into the aeration holes where they have direct soil contact and protection.
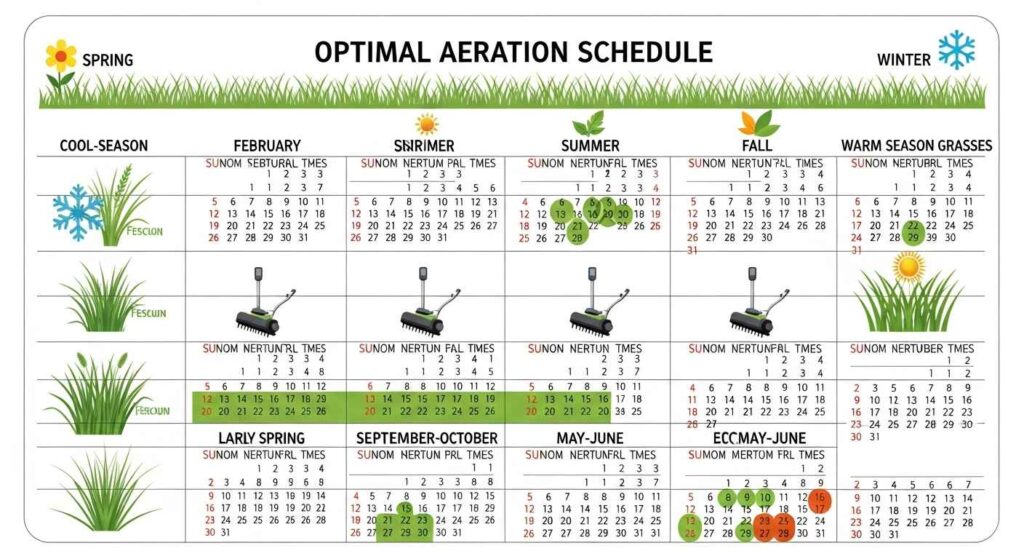
When to Aerate Your Lawn
Timing is crucial for successful aeration. You want to aerate the lawn when your grass is in its peak growing period so it can recover quickly.
Cool-Season Grasses (Fescue, Bluegrass, Ryegrass)
Best Times: Early spring (March-April) or fall (September-October)
Cool-season varieties should be aerated during the spring or fall. Fall is generally preferred because:
- Grass focuses on root growth as temperatures cool
- Less stress from summer heat
- Ideal conditions for overseeding
Warm-Season Grasses (Bermuda, St. Augustine, Zoysia)
Best Time: Late spring through early summer (May-July)
For those with warm-season grass, such as Bermuda or St. Augustine, late spring, once grass has come out of dormancy, is the ideal time for aeration.
Signs Your Lawn Needs Aeration
Watch for these indicators that your soil is compacted:
- Water pools on the surface after rain
- Grass feels spongy when you walk on it
- Bare spots that won’t grow grass
- Thinning or browning areas
- Heavy foot traffic areas look worn
- Hard, crusty soil surface
- Poor drainage after watering
Simple Test: Push a screwdriver into your soil. If it’s difficult to penetrate 2-3 inches, your lawn needs aeration.
Lawn Aeration Methods Explained
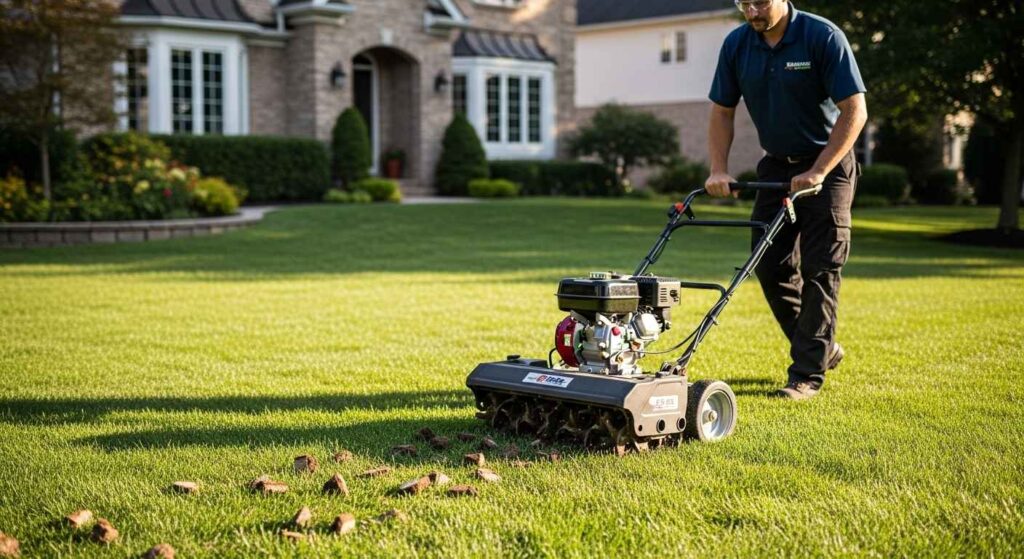
Core Aeration (Recommended)
Core aeration is the best and most effective method. This process removes actual plugs of soil, typically 2-4 inches deep and 0.5-0.75 inches in diameter.
Tools needed:
- Manual core aerator (small lawns)
- Walk-behind aerator (medium lawns)
- Tow-behind aerator (large lawns)
- Professional aerator rental
Process:
- Water your lawn 1-2 days before (soil should be moist, not soggy)
- Mark sprinkler heads and shallow utilities
- Make 2-3 passes over the entire lawn
- Leave soil plugs on the surface to decompose
- Apply fertilizer or overseed immediately after
Spike Aeration (Limited Effectiveness)
Spike aeration uses solid tines to poke holes without removing soil. While easier and cheaper, it’s less effective because:
- Can actually increase compaction around holes
- Doesn’t remove soil plugs
- Provides temporary improvement only
When to use: Light compaction or as a maintenance measure between core aeration treatments.
Liquid Aeration (Soil Conditioner)
Liquid aeration products contain surfactants and soil conditioners that claim to reduce compaction. While these products can improve soil structure over time, they don’t provide the immediate mechanical relief of core aeration.
DIY Lawn Aeration Step-by-Step
Before You Start
- Check the weather: Aerate when soil is moist but not waterlogged
- Water if needed: If soil is dry, water 1-2 days before
- Mark obstacles: Flag sprinkler heads, buried cables, and shallow pipes
- Mow your lawn: Cut grass shorter than usual for easier aeration
Aeration Process
- Choose your tool: Rent or buy an aerator suitable for your lawn size
- Make multiple passes: Go over the entire lawn 2-3 times in different directions
- Focus on problem areas: Spend extra time on compacted zones
- Don’t clean up plugs: Leave soil cores on the surface to decompose naturally
- Follow up immediately: This is the perfect time for fertilizing or overseeding
After Aeration Care
- Fertilize: Apply fertilizer while holes are open
- Overseed: Seed falls directly into aeration holes
- Water regularly: Keep soil moist for 2-3 weeks
- Avoid heavy traffic: Let grass recover for several weeks
Professional vs DIY Aeration
When to Hire Professionals
- Large lawns (over 1 acre)
- Severe compaction issues
- Limited time or physical ability
- Need for specialized equipment
Professional services typically cost $75-$200 per treatment, depending on lawn size.
DIY Advantages
- Cost savings over time
- Control over timing and technique
- Ability to focus on problem areas
- Satisfaction of doing it yourself
Equipment rental costs: $40-80 per day for walk-behind aerators.
Common Aeration Mistakes to Avoid
Wrong Timing
Don’t aerate during dormant periods or extreme weather. Your grass needs active growth to recover from the process.
Dry Soil Conditions
In areas with clay soils, core aeration should be done twice a year – in the Spring and Fall. But never aerate bone-dry clay soil, as it becomes too hard to penetrate effectively.
Single Pass Only
Make multiple passes in different directions. One pass doesn’t provide adequate soil disruption for compacted lawns.
Cleaning Up Plugs
Leave soil cores on the lawn surface. They contain beneficial microorganisms and will break down naturally, adding organic matter to your soil.
Skipping Follow-up Care
Aeration creates the perfect opportunity for fertilizing and overseeding. Don’t waste this window.
Aeration Tools and Equipment Guide
Manual Core Aerators
Best for: Small lawns under 1,000 sq ft Cost: $30-80 Pros: Targeted aeration, good exercise, precise control Cons: Labor intensive, time consuming
Walk-Behind Aerators
Best for: Medium lawns 1,000-5,000 sq ft Cost: $300-800 or $50-80 rental Pros: Faster than manual, good results, manageable size Cons: Still requires physical effort
Tow-Behind Aerators
Best for: Large lawns over 5,000 sq ft with riding mower Cost: $200-500 Pros: Covers ground quickly, less physical effort Cons: Needs tractor or riding mower, storage space
Powered Aerators
Best for: Professional use or very large properties Cost: $1,500+ or $80-120 rental Pros: Most effective, fastest coverage, consistent results Cons: Expensive, requires training, heavy equipment
Aeration Frequency Guidelines
Normal Conditions
Most lawns benefit from annual aeration. We recommend you aerate your lawn once per year.
High-Traffic Areas
Lawns with heavy foot traffic, pets, or frequent use may need aeration twice per year.
Clay Soil
In areas with clay soils, core aeration should be done twice a year – in the Spring and Fall. Clay compacts more easily and benefits from regular treatment.
Sandy Soil
In areas with more sandy soils, it should be done once a year. Sandy soils don’t compact as readily as clay.
Cost Analysis: DIY vs Professional
DIY Costs
- Equipment rental: $50-80 per day
- Purchase manual aerator: $30-80
- Purchase walk-behind: $300-800
- Annual cost (rental): $50-80
Professional Service Costs
- Small lawn (under 5,000 sq ft): $75-125
- Medium lawn (5,000-10,000 sq ft): $125-175
- Large lawn (over 10,000 sq ft): $175-250
Break-even point: If you plan to aerate for 3+ years, buying equipment often costs less than professional services.
Troubleshooting Common Issues
Hard, Dry Soil
Solution: Water lawn thoroughly 1-2 days before aerating. Soil should be moist 3-4 inches deep.
Plugs Won’t Come Out
Problem: Soil too dry or aerator needs maintenance Solution: Check soil moisture, clean aerator tines, ensure proper technique
Minimal Improvement After Aeration
Causes: Single pass only, wrong timing, skipped follow-up care Solution: Make multiple passes, aerate during active growth periods, fertilize immediately after
Equipment Keeps Clogging
Problem: Soil too wet or aerator tines dull Solution: Wait for proper soil conditions, clean/sharpen tines regularly
Maximizing Aeration Results
Pre-Aeration Preparation
- Soil test: Know your pH and nutrient levels
- Plan timing: Coordinate with fertilizing and overseeding
- Equipment check: Ensure aerator is clean and properly maintained
- Weather monitoring: Choose optimal soil moisture conditions
Post-Aeration Activities
- Immediate fertilization: Nutrients reach root zone directly
- Overseeding: Seeds fall into aeration holes for better germination
- Topdressing: Apply thin layer of compost for organic matter
- Proper watering: Maintain consistent moisture for recovery
Seasonal Lawn Care Integration
Aeration works best as part of a comprehensive lawn care program. Here’s how it fits with other maintenance tasks:
Spring Program
- Early spring: Core aeration (cool-season grasses)
- Immediately after: Apply pre-emergent herbicide and fertilizer
- 2-3 weeks later: Overseed thin areas
- Ongoing: Regular watering and mowing
Fall Program
- Early fall: Core aeration (preferred for cool-season grasses)
- Immediately after: Fertilize and overseed
- Throughout fall: Maintain consistent watering
- Late fall: Final fertilizer application
Year-Round Benefits
Regular aeration supports your other lawn investments by:
- Making fertilizer more effective
- Improving irrigation efficiency
- Reducing need for herbicides
- Supporting beneficial soil microbes
For more comprehensive lawn care guidance, check out our detailed lawn watering schedule to complement your aeration program, and learn about the best grass types for different climates to ensure you’re aerating at the right time for your specific grass variety.
Final Thoughts
This helps the roots grow deeply and produce a stronger, more vigorous lawn. Lawn aeration is one of the most important maintenance practices for long-term grass health, yet it’s often overlooked by homeowners.
The investment in annual aeration pays dividends through:
- Reduced watering needs
- Better fertilizer efficiency
- Fewer pest and disease problems
- Thicker, more resilient turf
Whether you choose DIY methods or professional services, consistent aeration will transform your lawn from struggling to thriving. Start with a soil test, choose the right timing for your grass type, and commit to regular aeration as part of your lawn care routine.
Your grass roots will thank you, and your neighbors will notice the difference.

Leave a Reply