The fix takes anywhere from 5 minutes to a couple of hours — it all depends on the hole size and which method you use. This guide covers every type, from a tiny nail hole to a fist-sized gap, with real product names, honest drying times, and the mistakes that make patches look bad even after they dry.
Skill Level: Beginner–Intermediate | Time: 5 min – 2 hours (by method) | DIY Cost: $10–$50 vs. Pro: $75–$300+
Quick Answer: Nail holes and small dents take 5 minutes — fill with spackling, let dry, sand flat, touch up with paint. Medium holes (up to 6 inches) use a self-adhesive mesh patch plus two coats of joint compound. Large holes need a drywall backer, a cut patch, and three coats of compound. In all cases, priming before painting is what keeps the patch from standing out.
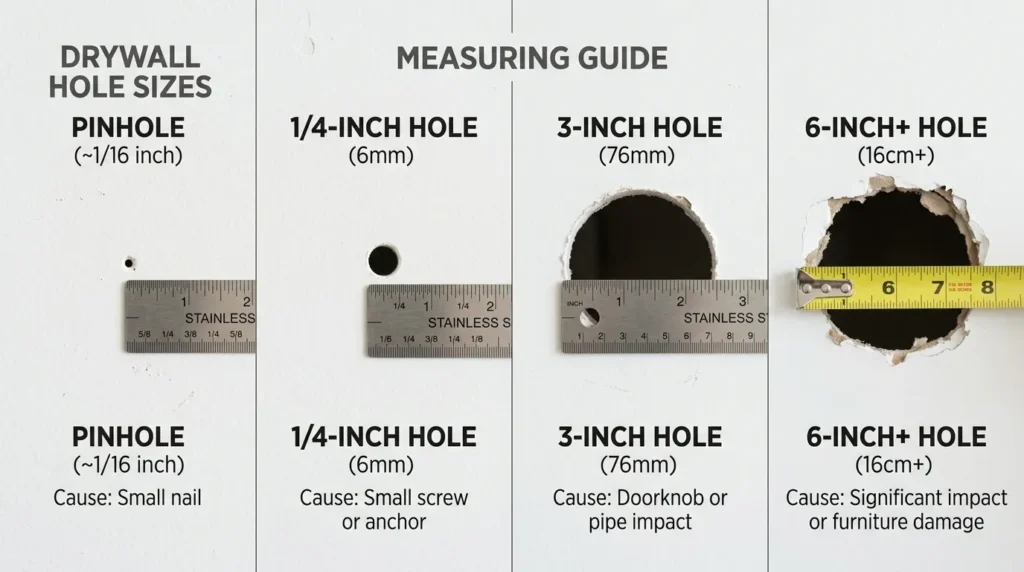
What Type of Hole Do You Have? Identify It First
The method you pick — and the products you need — depend entirely on hole size. Grab a ruler before you head to the hardware store.
| Size Category | Measurement | Common Causes | Best Method | Time to Finish |
|---|---|---|---|---|
| Nail / Pin Holes | ⅛ inch or less | Picture nails, screws, pushpins | Spackling compound | Under 5 min + dry time |
| Small Holes | ¼ to ½ inch | Anchors, cabinet screws, doorstops | Spackling or patch kit | 15–20 min + dry time |
| Medium Holes | ½ inch to 6 inches | Doorknobs, accidental impact, outlets | Mesh patch + joint compound | 1–2 hours (multiple coats) |
| Large Holes | Over 6 inches | Furniture, plumbing access, major damage | Drywall backer + new panel section | Half day (with dry time) |
Safety first: Before cutting or drilling into any wall, locate your studs and check for utility lines. Electric wires typically run vertically between studs. A $15 stud finder handles this in 30 seconds. For a broader look at staying safe during home repairs, review these essential electrical safety tips for homeowners.
Tools and Materials You Need (By Repair Type)
You don’t need a full contractor kit. Match your supply list to the hole size.
Small Holes — ~$10–$15
- Spackling compound (DAP DryDex)
- 3-inch putty knife
- 100-grit sanding sponge
- Drywall primer + touch-up paint
Medium Holes — ~$20–$30
- Self-adhesive mesh patch (3M brand)
- Pre-mixed all-purpose joint compound
- 6-inch taping knife
- 120-grit sandpaper
- Drywall primer
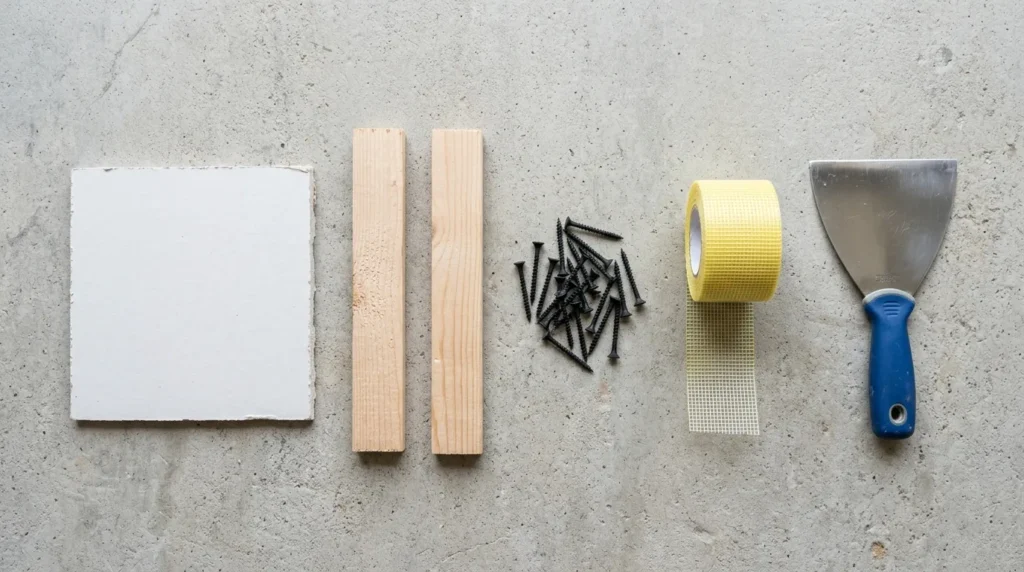
Large Holes — ~$35–$50
- ½-inch drywall panel (cut to size)
- Furring strips or backer board
- 1¼-inch drywall screws
- Fiberglass mesh tape
- All-purpose joint compound
- 10–12-inch finishing knife
- Primer + interior paint
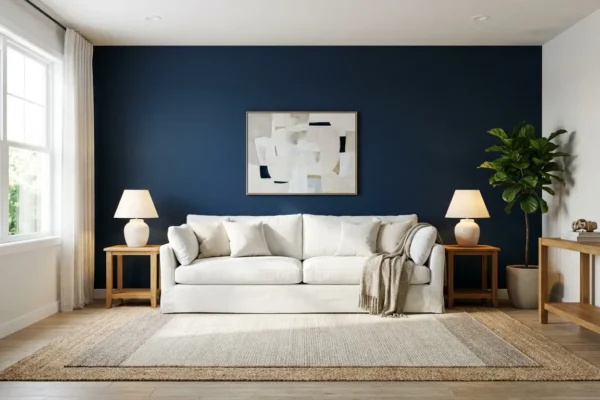
Once your repair is done, choosing the right paint finish matters more than most people realize. A flat sheen hides surface imperfections; a semi-gloss amplifies them. The complete paint finish guide for every room breaks down which sheen to use where.
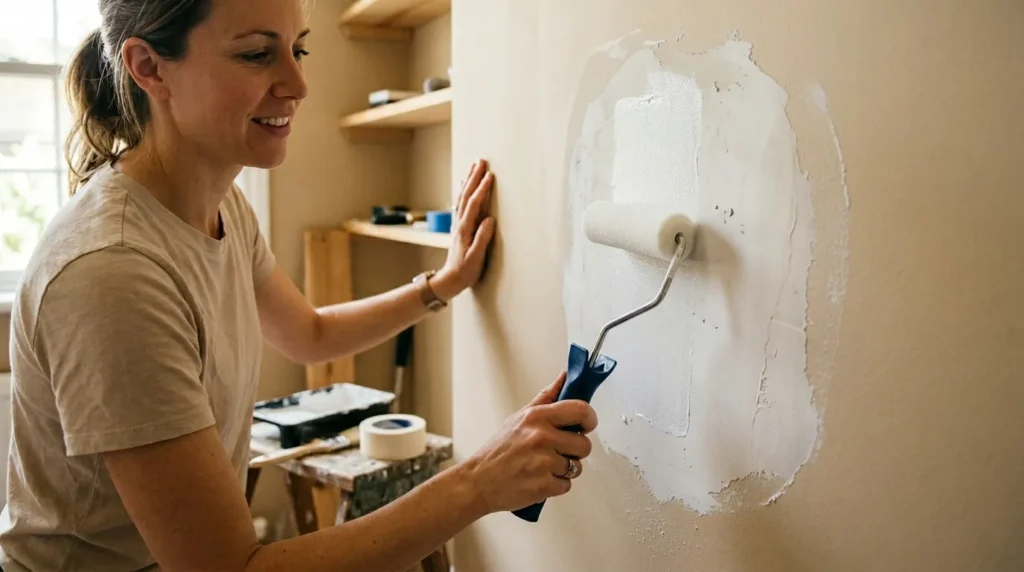
How to Fix Nail Holes and Tiny Screw Holes (Under 5 Minutes)
This is the most common drywall repair there is. Moving out of an apartment or redecorating? Nail holes close up fast.
Step 1 — Clean the hole Push any loose paper facing back against the wall. Flakes of gypsum around the edge will crack through your patch if you leave them.
Step 2 — Apply spackling with a putty knife Use DAP DryDex (goes on pink, dries white — no guessing), DAP Patch-N-Paint, or 3M High Strength Small Hole Repair. Press it into the hole and scrape flush in one pass. Don’t glob it on — you want it level with the wall surface.
Step 3 — Let it dry, then sand DAP DryDex dries in about 30 minutes for nail holes. Once fully white, lightly sand with a 100-grit sanding sponge. Two passes is enough. Wipe the dust off before painting.
That’s it for nail holes. If you’re touching up multiple holes on one wall, do them all at once, let them dry together, sand in one session, and paint after.
How to Repair Small Drywall Holes (¼ to ½ Inch)
These are a step up from nail holes — wall anchors, towel bar screws, and cabinet hardware leave this kind of damage. Spackling compound still works, but you need to build it up.
Step 1 — Remove any anchor or hardware If there’s a plastic wall anchor stuck in the hole, push it through into the wall with a screwdriver — don’t try to pull it out, or you’ll tear a bigger hole.
Step 2 — First coat of spackling — underfill slightly Apply spackling and fill the hole about 80% full. Spackling shrinks as it dries. Overfilling means extra sanding work.
Step 3 — Let it dry fully, then add a second coat Once the first coat is completely dry (no soft or cool spots), apply a thin second coat and scrape it flush.
Step 4 — Sand smooth Use a 120-grit sanding sponge. Go lightly in a circular motion so you don’t dig into the surrounding paint. Wipe clean.
Step 5 — Prime and paint One coat of drywall primer prevents the patch from absorbing paint differently than the rest of the wall. Without it, you’ll see a dull spot even after two paint coats.
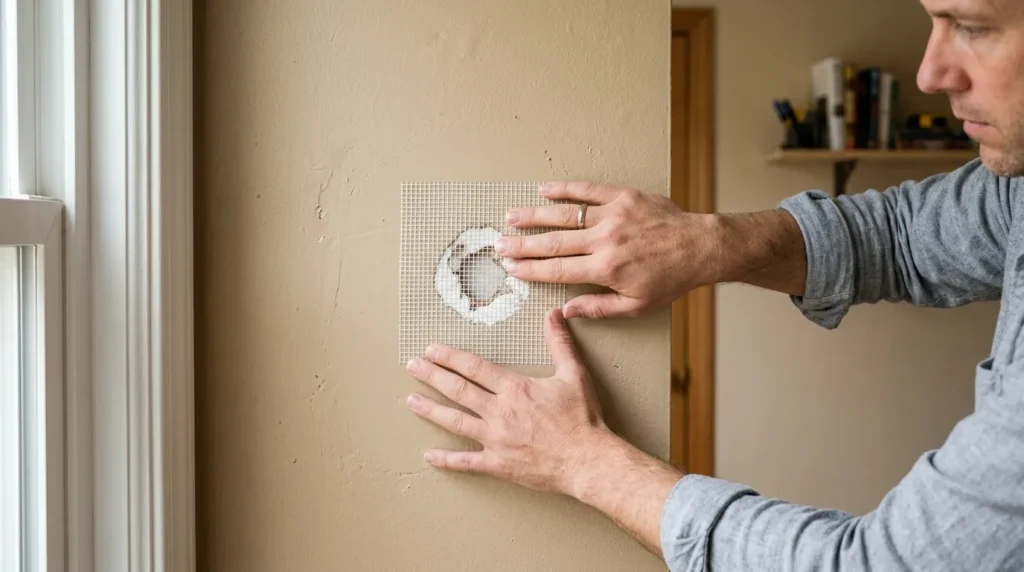
How to Patch Medium Drywall Holes (½ Inch to 6 Inches)
This is where most homeowners have trouble. Doorknob dents, fist-sized accidents — these need a real patch, not just spackle. Two methods work well here depending on your skill level.
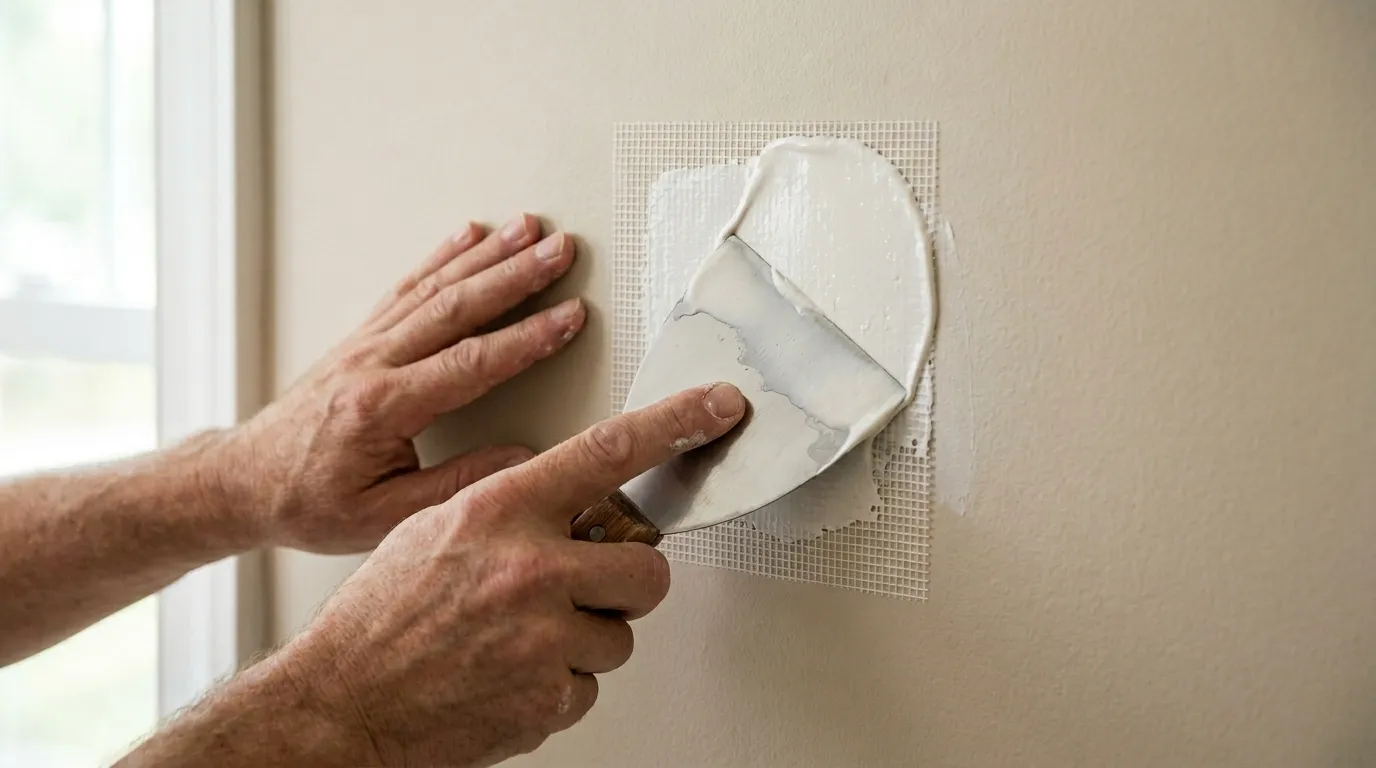
Method 1: Self-Adhesive Mesh Patch (Beginner — Fastest)
Step 1 — Clean up the hole edges Knock back any torn paper or crumbled gypsum with a utility knife. The patch needs a flat surface to stick to.
Step 2 — Peel and stick the mesh patch Center the self-adhesive fiberglass mesh patch over the hole. These come in 4-inch, 6-inch, and 8-inch sizes — pick one that overlaps the damage by at least 1 inch on each side. Press firmly.
Step 3 — First coat of joint compound Use a 6-inch taping knife and apply pre-mixed joint compound (all-purpose blue lid works fine) over the mesh. Push compound into the mesh weave, then feather the edges out 3–4 inches beyond the patch. The mesh needs to be fully embedded — you shouldn’t see bare mesh after this coat.
Step 4 — Let it dry — full dry, not surface dry Pre-mixed compound needs 24 hours per coat. If you’re in a hurry, use Easy Sand 20 or Easy Sand 45 (hot mud) — it sets chemically in 20–45 minutes and is sandable soon after.
Step 5 — Second coat — wider feathering Apply a thinner second coat, feathered out 6–8 inches from center. The goal is to make the transition invisible. Use a 10-inch knife if you have one.
Step 6 — Light sand, prime, paint Once fully dry, sand with 120-grit paper. Skim off any ridges. Prime the patch and let the primer dry completely before painting.
Method 2: California Patch (Cleaner Result — Intermediate)
This method skips mesh tape entirely. It uses a piece of drywall with its paper backing still attached, which acts as its own tape. Less likely to crack long-term.
Step 1 — Cut a clean square or rectangle around the damage Use a utility knife and straight edge. Clean, 90-degree cuts are easier to patch than jagged irregular holes.
Step 2 — Cut a patch piece 2 inches larger on each side On the back of a scrap piece of ½-inch drywall, score a square matching the hole size. Snap the gypsum core, but leave the paper facing intact as a 2-inch border all around. This paper border is the key to the method — it bonds directly to the wall face.
Step 3 — Apply joint compound around the hole Spread a thin coat on the wall around the hole opening to act as adhesive.
Step 4 — Press the patch into place Set the patch in the hole with the paper tabs flat against the wall. The gypsum core fills the opening; the paper tabs embed into the wet compound. Smooth the tabs with a knife.
Step 5 — Two more coats, feathered wide Same process as the mesh method — two coats of compound, widening the feather with each coat. Sand and prime when dry.
How to Fix Large Drywall Holes (Over 6 Inches)
Anything larger than 6 inches needs solid backing — mesh patches won’t bridge a gap that big without cracking. This is still a DIY job. It just takes longer.
Furring Strip Backer Method
Step 1 — Square off the hole Use a drywall saw or utility knife to cut the hole into a clean rectangle. This makes the patch fit precisely.
Step 2 — Install backer strips inside the wall Cut two 1×3 furring strips about 4 inches longer than the hole’s height. Slide them into the wall cavity on either side of the opening. Hold each strip flush against the back of the drywall and drive 1¼-inch drywall screws through the existing drywall face into the strip. This creates a solid nailing surface.
Step 3 — Cut and screw in the patch Cut a piece of ½-inch drywall to exactly match the hole dimensions. Screw it to the furring strips — screws every 6 inches along each side, slightly countersunk (dimpled, not torn).
Step 4 — Tape all seams with fiberglass mesh tape Run mesh tape over every joint. This is where the patch meets existing drywall — tape keeps compound from cracking at the seam over time.
Step 5 — Three coats of joint compound First coat: fill and embed tape. Second coat: feather 8–10 inches out. Third (finish) coat: thin and wide, sanded smooth once dry. Prime, then paint.
For a full checklist of common home maintenance repairs beyond drywall, the complete home repairs and maintenance guide covers the essential tasks most homeowners overlook.
Applying Joint Compound Correctly: Coats, Feathering, and Drying
This step trips up most beginners. The patch isn’t just about covering the hole — it’s about making the surface look flat under paint.
Feathering means thinning the edges of each compound coat so the transition between patch and wall is gradual. A sharp edge always shows under paint. With proper feathering, there’s no visible edge at all.
Each coat should be wider and thinner than the last. By the final coat, you’re spreading compound 10–14 inches from center.
| Compound Type | Dry / Set Time | Best For | Notes |
|---|---|---|---|
| Pre-mixed all-purpose | 24 hours per coat | Medium and large repairs | Blue lid. Shrinks slightly. Easiest to sand. |
| Lightweight pre-mixed | 24 hours per coat | Finish coats | Easier to spread. Not for first coats over mesh. |
| Easy Sand 20 (hot mud) | 20–30 min set | All repairs, fast schedule | Mixes from powder. Can’t remix once set. |
| Easy Sand 45 (hot mud) | 45 min set | Large repairs, more working time | Harder to sand than pre-mixed. Very strong. |
How to Match Wall Texture After Patching
Texture is the part most guides skip — and it’s the reason repairs look obvious even after painting. Matching your existing texture takes 10 extra minutes and makes a significant difference. For deeper technique detail on working with different wall textures, see this complete guide to textured wall painting techniques.
Smooth / Flat Walls
Your finish coat of compound should be as thin and flat as possible. Sand with 120-grit, then 150-grit. Prime with a PVA-based drywall primer. Any surface irregularity will telegraph through paint, especially with flat or eggshell sheens.
Orange Peel Texture
This is the most common wall texture in American homes built after 1980. It looks like the skin of an orange — small, even bumps. To replicate it, use a can of Homax Orange Peel Wall Texture spray. Shake well, test on cardboard first, then apply from 18–24 inches away with light overlapping passes. Let dry 30 minutes before painting.
Knockdown Texture
Knockdown has flat, irregular islands separated by smooth valleys. To recreate it: thin pre-mixed compound to pancake-batter consistency, apply it with a texture roller or trowel in random splatters, then lightly drag a clean knife over the peaks after 5–10 minutes to flatten (knock down) them. Match your timing to the surrounding texture’s thickness.
How to Prime and Paint Over a Drywall Patch
Bare compound is porous. It soaks up paint faster than the surrounding wall. That creates a dull spot called flashing — even if the patch is perfectly smooth, the paint sheen looks different over the repair.
One coat of PVA drywall primer (Zinsser Gardz or Sherwin-Williams ProBlock both work well) seals the surface. Let it dry fully — at least 1 hour. Then paint as normal.
If you’re touching up a small area with the original wall paint, the repainted patch often looks slightly different due to paint fade on the surrounding wall. If the color difference bothers you, repaint the entire wall from corner to corner — it’s the only way to get a truly invisible result. Reviewing the best interior paint brands currently available can help you pick a durable finish that holds its sheen over time.
Before you paint, use the paint coverage calculator to estimate how much paint you need — especially if you’re doing a full wall repaint after patching.
6 Drywall Repair Mistakes That Ruin the Job
1. Skipping primer Paint applied directly over compound absorbs unevenly. The patch always shows.
2. Applying compound too thick in one coat Thick coats crack as they dry. Three thin coats beat one thick coat every time.
3. Not feathering the edges If you end the compound with a hard edge, you’ll see a ridge under paint. Spread it thin and wide.
4. Painting before the compound is fully dry Compound that looks dry on the surface can still be wet underneath. Paint traps moisture and causes bubbling or cracking.
5. Skipping texture matching A smooth circle on a textured wall announces itself under paint. Spend 10 minutes matching the texture.
6. Using spackle for medium or large holes Spackle isn’t formulated for structural repairs over mesh. It cracks under stress. Use joint compound for anything over ½ inch.
If your walls have been dealing with more than just holes — maybe water stains, worn finishes, or damaged baseboards — it’s worth taking a full pass through your home’s repair checklist. The guide on common home repairs and routine maintenance covers what to inspect and fix seasonally.
Can You Finish a Drywall Repair in One Day?
Yes, for small and medium holes — if you use quick-setting compound (hot mud). Easy Sand 20 or Easy Sand 45 sets in 20–45 minutes, so you can apply two to three coats in a single morning and be painting by afternoon. With standard pre-mixed compound, each coat needs 24 hours — that puts most repairs on a 2–3 day schedule.
When to Call a Professional
Most drywall repairs are genuinely DIY-friendly. But some situations are worth handing off.
Water damage: If a hole or crack is surrounded by brown stains, bubbling paint, or soft drywall, there’s moisture behind the wall. Fix the leak first or the patch will fail. If the water reached your floors as well, the guide on how to restore water-damaged wood floors covers what’s salvageable and what isn’t.
Structural damage: Cracks that run diagonally from window corners or door frames can signal foundation movement. Patching the surface won’t fix the underlying problem.
Multiple large holes or full-room damage: At some point, hanging and finishing new drywall panels is faster and cheaper than patching dozens of holes one by one. Professional drywall repair typically runs $75–$300 per hole. Full room drywall replacement costs $1.50–$3.00 per square foot for materials and $2–$4 per square foot for labor.
Frequently Asked Questions
How long does drywall repair take from start to finish? Nail holes take under an hour including dry time. Small holes are 1–2 hours. Medium holes take 1–3 days using pre-mixed compound (multiple coats, 24 hours each) or a few hours with hot mud. Large holes take a full day minimum.
Can I paint over a drywall patch the same day? Only if you used quick-setting compound and it has fully set and hardened — typically 2–3 hours after the final coat. Pre-mixed compound needs 24 hours per coat. Painting over wet compound traps moisture and causes the surface to crack or peel.
What is the best product for fast drywall repair? For nail holes: DAP DryDex Spackling — it changes color when dry, removing all guesswork. For medium holes needing a fast turnaround: USG Easy Sand 20 (sets in 20 minutes). For all-purpose medium and large repairs: a 3M self-adhesive mesh patch kit paired with all-purpose pre-mixed joint compound.
Why does my patched area look shiny or dull compared to the wall? That’s called flashing — raw compound absorbs paint differently than the primed surrounding wall. The fix is PVA drywall primer applied before painting. If the sheen difference is already visible, scuff the patch lightly, re-prime, and repaint.
Can I use spackle instead of joint compound for large repairs? No. Spackling compound is designed for small, shallow fills. For anything over half an inch, it shrinks too much and lacks the structural bond needed over mesh or tape. Joint compound is the correct product for medium and large repairs.

Leave a Reply