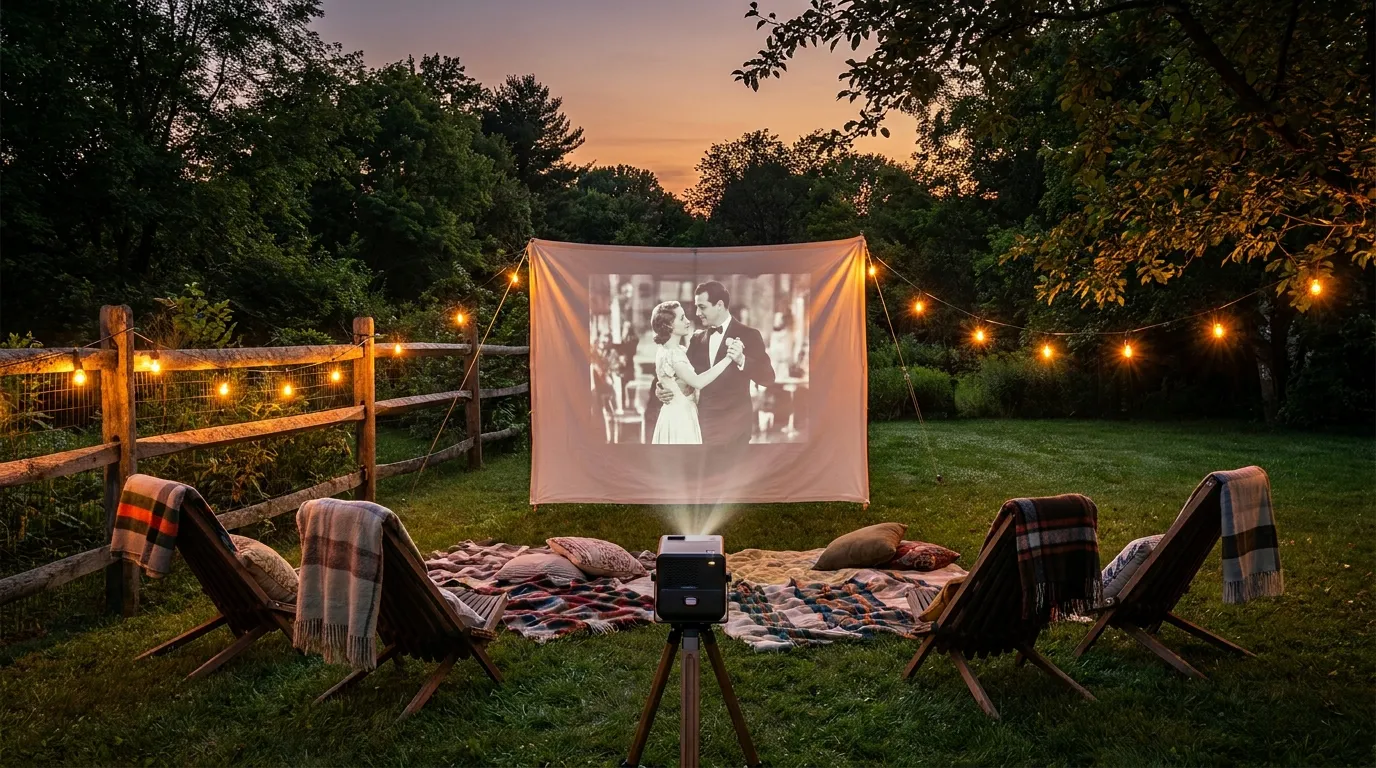
Most people assume a backyard movie setup is either complicated or expensive. It’s neither. Three pieces of gear, a grounded outdoor outlet, and 20 minutes is all you need. You can run a full cinema experience — sharp picture, real sound, 100-inch screen — and stay well under $300.
This guide covers exactly what to buy, what measurements to take before you buy anything, how to connect it all, and how to get a clear picture even if your yard isn’t perfectly dark. No filler. Just what works.
What You Actually Need (And What to Skip)
Three items do the job:
- A portable projector ($80–$150)
- A projection screen ($0–$50)
- A Bluetooth speaker ($30–$60)
That’s the core setup. Everything else is optional. Most people overspend by purchasing a streaming stick, a dedicated stand, and a screen all at once — before they’ve even tested whether the projector works in their yard.
Start with the three essentials. Run it once. Then decide what, if anything, is missing.
Skip on your first build:
- 4K projectors — the jump from 1080p is invisible at 10–15 feet in open air
- Inflatable screens — they look dramatic but require a blower running all night
- Surround sound systems — two flanking Bluetooth speakers outperform most people’s expectations
- Dedicated projector mounts — a $15 adjustable tripod does the same job
Choosing a Projector Under $150
This is where most beginners go wrong. They pick a projector based on the wrong number.
Lumens: The Number That Matters Most Outdoors
Projector brightness is measured in ANSI lumens. The higher the number, the brighter the image. For outdoor use after dark, you need at least 200 ANSI lumens. Most budget projectors advertise “LED lumens” or raw lux figures — these are marketing numbers, typically 5 to 10 times higher than actual ANSI output. Ignore them entirely.
In practice: a projector producing 300–600 ANSI lumens delivers a sharp, watchable picture on an 80″–100″ screen after full sunset. Start your movie 25–30 minutes after dark. Anything earlier and ambient light washes out the contrast.
Throw Distance — How Far Back Does the Projector Sit?
Every projector has a throw ratio — the relationship between projector distance and image width. The formula is simple:
Required distance (ft) = screen width (ft) × throw ratio
Most budget models have a throw ratio between 1.2 and 1.5. For a 7-foot-wide screen (roughly 100″ diagonal), you need the projector sitting 8.4 to 10.5 feet back. Measure your available space before ordering anything. If your yard is tight, filter specifically for short-throw models.
Best Budget Projectors in 2026 (Under $150)
| Model | Price | Key Strength |
|---|---|---|
| WiMiUS P61 | ~$90 | Native 1080p, 5G Wi-Fi, Bluetooth 5.0 |
| Magcubic HY310X | ~$110 | 420 ANSI lumens, native 1080p, beginner-friendly |
| Aurzen EAZZE D1 | ~$99–$130 | Auto keystone, front/rear projection, built-in apps |
| ViewSonic M1 Mini | ~$140 | Built-in battery, Netflix-ready, portable |
All four support Bluetooth audio output, handle 1080p content, and connect to a streaming stick via HDMI. The WiMiUS P61 is the strongest all-around value. The ViewSonic is the best pick if you want to run it without a power cord.

The Screen: Buy One or DIY?
Both options work well after dark. The difference comes down to 20 minutes of setup time versus $35 in savings.
DIY Screen Options (Under $20)
A white painter’s drop cloth from any hardware store produces a clean, bright image. The critical factor is tension — a wrinkled or sagging surface creates visible distortion regardless of projector quality.
To build a rigid DIY frame:
- Buy a 10×10 ft white drop cloth (~$12)
- Cut four lengths of 1-inch PVC pipe to frame the desired screen size
- Connect corners with standard elbow joints
- Stretch the cloth tightly over the frame and secure with bungee clips
Total cost: under $20. Assembly time: 10 minutes on first build, 5 minutes after that.
Budget Collapsible Screens ($35–$50)
A freestanding collapsible screen skips the build entirely. The 80″ size (measured diagonally) hits the sweet spot — large enough for 10–12 people, compact enough for most backyards. These come with ground stakes and tie-down ropes for wind resistance.
How Big Should Your Screen Be?
Use this sizing rule: screen width (inches) = viewing distance (feet) × 4.
For a 10-foot viewing distance, you want roughly a 40-inch-wide screen — that’s an 80″ diagonal. For a 15-foot distance, aim for 60 inches wide, or about 120″ diagonal. Don’t size the screen bigger than your projector can illuminate. An underpowered projector on a 120″ screen produces a dim, faded image.
Sound That Works Outside
Built-in projector speakers output 2–5 watts. In open air, that disappears fast. A single 20-watt Bluetooth speaker placed correctly makes a bigger difference than any projector upgrade.
Speaker Placement for Open Air
Position the speaker directly below or beside the screen, facing the audience. This keeps dialogue sharp and eliminates the muffled effect that happens when sound has to travel past seated viewers.
For groups of 15 or more, two speakers flanked on either side of the screen creates a clean stereo image without a subwoofer. For advice on scaling up beyond the budget range, this guide to the best outdoor sound systems for parties covers more powerful options worth considering once you’re ready to upgrade.
Best Budget Speakers Under $60
| Speaker | Price | Output | Rating |
|---|---|---|---|
| Tribit XSound Go | ~$35 | 12W | IPX7 waterproof |
| Anker Soundcore Motion 100 | ~$45 | 20W | Water-resistant |
| JBL Clip 5 | ~$50 | 12W | IP67, 12-hr battery |
The Tribit is the best value for small groups. The Anker Motion 100 is worth the extra $10 for larger yards — 20 watts carries noticeably further in open air.
Power, Cables, and the Stuff Nobody Mentions
Extension Cords (Outdoor-Rated Only)
Standard indoor extension cords are a safety hazard outside. Use a cord with a SJTW jacket rating — it’s moisture-resistant and suitable for outdoor use. A 12-gauge, 25-foot SJTW cord handles projector, speaker charger, and a fan simultaneously without voltage drop. Most hardware stores carry these for $15–$20.
Pair it with a surge-protected power strip. Projectors are sensitive to voltage spikes — a $15 surge strip is cheap insurance.
Projector Stands
An adjustable laptop tripod stand ($12–$20) lets you raise the projector to screen center height, tilt the angle precisely, and reposition without improvising. It’s the most commonly skipped item in outdoor setups and the one that causes the most frustration when absent.
Streaming Devices
If your projector lacks built-in Wi-Fi:
- Amazon Fire TV Stick 4K (~$50) — plug directly into the projector’s HDMI port. Access Netflix, Prime Video, Disney+, Hulu, Apple TV+.
- Roku Express 4K+ (~$35) — simpler interface, same streaming access. Better choice if you’re outside the Amazon ecosystem.
Wi-Fi tip: Connect your streaming stick to your router’s 5 GHz band, not 2.4 GHz. In open outdoor environments, 2.4 GHz congestion causes buffering. If the router is far from your yard, place a mesh node or Wi-Fi extender near a window that faces the setup area.
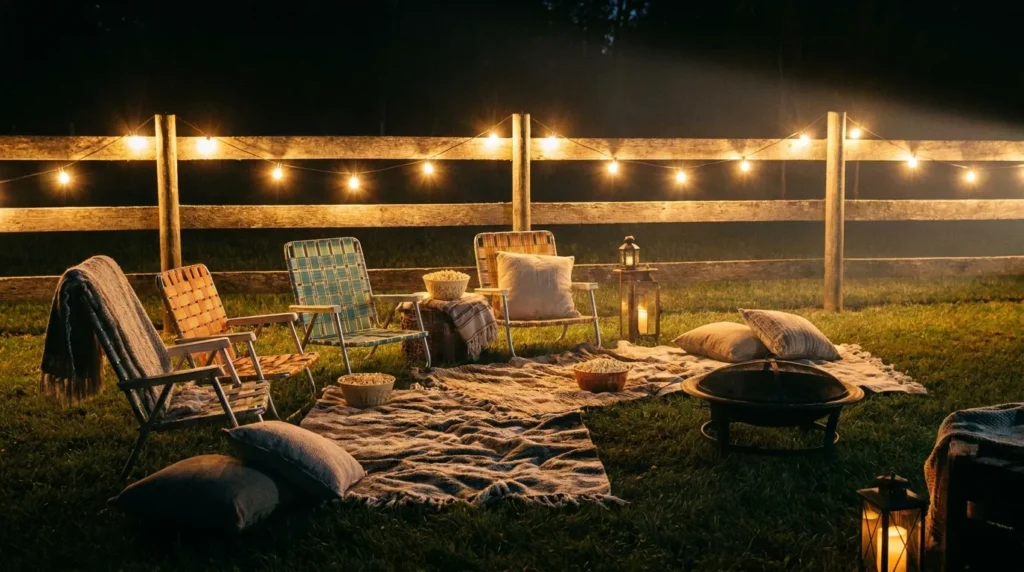
Seating and Atmosphere
You don’t need to spend anything here. Lawn chairs, camp chairs, blankets, and air mattresses all work. The important thing is sightline management — anyone seated behind another person needs to see over them. Keep rows low or stagger positions diagonally.
For a quick seating upgrade using materials you may already have, these DIY pallet furniture ideas can produce a solid outdoor couch or platform bench in a few hours for next to nothing.
Simple atmosphere additions that cost almost nothing:
- String lights hung behind the audience (never in front — they’ll reduce screen contrast)
- Citronella candles or a clip-on mosquito repellent diffuser placed around the perimeter
- A cooler within arm’s reach so no one walks through the picture mid-film
- A chalkboard or folded card with the movie title — small detail, big effect on atmosphere
For more ideas on creating a welcoming outdoor space, this collection of cozy outdoor lighting ideas includes options that pair naturally with a cinema setup — warm, directional, and screen-safe.
If you’re thinking beyond one movie night and want to transform the backyard into a proper entertaining zone, affordable backyard makeover ideas under $1,000 covers projects that complement an outdoor theater setup nicely.
Full $300 Budget Breakdown
Here is the complete itemized setup at the $300 ceiling:
| Item | Product Example | Cost |
|---|---|---|
| Portable projector | WiMiUS P61 | ~$90 |
| Screen (DIY option) | Drop cloth + PVC frame | ~$18 |
| Screen (buy option) | 80″ collapsible freestanding | ~$40–$50 |
| Bluetooth speaker | Tribit XSound Go | ~$35 |
| Projector tripod stand | Adjustable laptop stand | ~$15 |
| Streaming stick | Roku Express 4K+ | ~$35 |
| Outdoor extension cord (25 ft SJTW) | Hardware store brand | ~$18 |
| Surge-protected power strip | Basic outdoor model | ~$15 |
| Total with DIY screen | ~$226 | |
| Total with collapsible screen | ~$258–$268 |
Both versions come in under $300, leaving $30–$75 for a second speaker, a larger screen, or snacks.
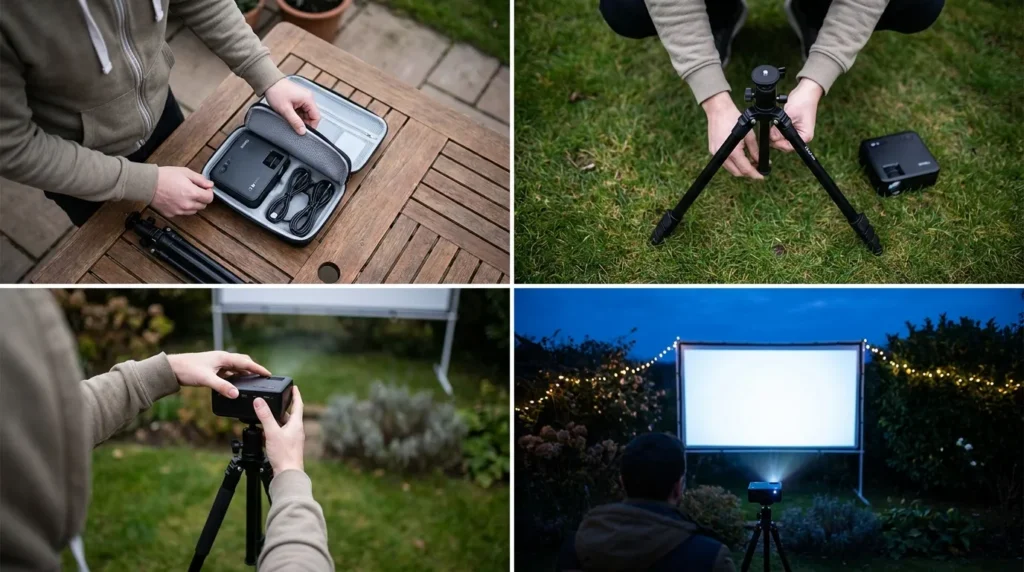
Setup Timeline: Start to Screen-On in 20 Minutes
Follow this order and you’ll be projecting on your first attempt without any troubleshooting detours:
- Scout the spot (2 min) — Pick a flat area with a clear backdrop or open space. Confirm your extension cord reaches a grounded outdoor outlet.
- Set up the screen (3–5 min) — Assemble the PVC frame or unfold the collapsible screen. Drive in stakes and run tie-down cords if it’s breezy.
- Mount the projector on the stand (2 min) — Position the tripod 8–12 feet from the screen. Raise the projector so the lens aligns with the center of the screen.
- Run power (2 min) — Lay the extension cord from the outdoor outlet to the power strip. Plug in the projector.
- Insert the streaming stick (1 min) — Plug the Fire Stick or Roku into the projector’s HDMI input. Power on both devices.
- Pair the Bluetooth speaker (1 min) — Enable Bluetooth on the projector or streaming device. Select the speaker from the device list.
- Adjust the image (3 min) — Use keystone correction to square the picture. Zoom or move the projector until the image fills the screen edge-to-edge and is sharp.
- Select the movie and press play (1 min) — Open your streaming app. Queue up the film.
Total: under 20 minutes. After one practice run, you’ll be under 12.
7 Tips to Get a Better Picture Outdoors
1. Start after full dark. Wait 25–30 minutes past sunset. Ambient light kills contrast faster than any cheap projector.
2. Face the screen away from streetlights. Light behind the audience is the main culprit for washed-out images — not the screen material.
3. Use keystone correction, not physical tilt. Tilting the projector body distorts the image geometrically. Most modern projectors auto-correct keystone — use that feature and keep the unit level.
4. Set your streaming device output to 1080p. Some default to 4K, which can cause frame drops or audio sync issues on budget projectors. Lock it to 1080p in the display settings.
5. Pre-charge your Bluetooth speaker. A dead speaker 40 minutes into a film is avoidable. Charge it the afternoon before.
6. Stake down every anchor point. A breeze hitting a freestanding screen makes the image ripple constantly. Use all included guy ropes and stakes. If wind is forecast above 15 mph, switch to a rigid PVC DIY frame — it doesn’t flex.
7. Have a 5-minute rain plan. Projectors are not water-resistant. If the forecast is uncertain, keep a tarp and a dry bag within reach. A 5-minute pack-down is all you need before gear gets damaged.
For a more permanent version of this setup — one with a built-in overhead structure for weather cover and screen mounting — these pergola design ideas for backyards show how to build a frame that doubles as an outdoor theater anchor point year-round.
Frequently Asked Questions
How many lumens do I need for an outdoor projector? Minimum 200 ANSI lumens for use after dark. For setups with any ambient light nearby — street lamps, porch lights, neighbor windows — aim for 400–600 ANSI lumens. Always verify the ANSI lumen spec, not the advertised LED or lux figure.
Can I use a white bed sheet as a projector screen? Yes, with one condition: it must be completely taut. Wrinkles and sag distort the image more than the sheet material itself. A well-tensioned white cotton sheet produces a sharp, bright picture in a dark yard.
Do I need a streaming stick if my projector has built-in Wi-Fi? Not always — but many built-in Wi-Fi projectors don’t support Netflix’s official app due to DRM licensing restrictions. A $35 Roku or Fire Stick resolves this immediately and opens every major streaming platform.
How far back does the projector need to sit from the screen? Take the screen width in feet and multiply it by the projector’s throw ratio (typically 1.2–1.5 for budget models). For a 7-foot-wide screen, that’s 8.4–10.5 feet. Check the spec sheet before you purchase.
Is a $300 outdoor cinema actually worth watching? Fully. Current $90–$130 projectors produce clean, detailed 1080p output. On an 80″–100″ screen in a dark yard, the visual result is comparable to a solid home theater setup. The biggest factor is ambient light control — not the hardware.


Leave a Reply